 Save to Pinterest
 The first time I tasted hojicha, it wasn't in a fancy tea ceremony but in a small Tokyo café where the owner's grandmother had taught her the roasting technique decades ago. That deep, toasty flavor stayed with me for months, so when I finally tried making a hojicha roll cake, I was nervous about translating something so ceremonial into something casual and shareable. The mango twist came from a happy accident—I had leftovers and thought, why not? That roll became the dessert I'd make whenever I wanted to feel like I was sharing something both unexpected and comforting.
I made this for my friend's dinner party last spring, and she spent the whole evening asking guests to guess what the flavor was—nobody expected roasted tea until she told them. Watching people's faces light up when that toasty, almost nutty taste registered was worth every careful fold of the batter, every tense moment waiting for the cake to cool without cracking.
Ingredients
- Eggs, separated: Room temperature eggs separate cleanly and whip up faster; the yolks bring richness while the whites create that tender, cloud-like crumb that makes a roll cake forgiving to work with.
- Cake flour and cornstarch: This pairing keeps the sponge delicate rather than dense, and the cornstarch in particular adds a soft, almost silky texture that's essential for rolling without cracking.
- Hojicha powder: Use high-quality roasted green tea powder—the toasting brings out warm, slightly smoky notes that regular matcha can't match, and it's what makes this cake worth making.
- Heavy cream, minimum 35% fat: Don't skimp here; full-fat cream whips to stable peaks and tastes luxurious, while lower-fat versions can turn grainy and separate.
- Mango: Choose one that yields slightly to pressure but isn't mushy; ripe enough to be sweet but firm enough to slice without falling apart during rolling.
Tired of Takeout? 🥡
Get 10 meals you can make faster than delivery arrives. Seriously.
One email. No spam. Unsubscribe anytime.
Instructions
- Set up and preheat:
- Get your oven to 170°C and line that tray with parchment so it overhangs slightly on two sides—this makes lifting the cake out so much easier later. Cold pans and cold hands are your enemies here; everything should be at room temperature or slightly warm.
- Build the yolk base:
- Whisk those yolks with half the sugar until they look pale and frothy, then add milk and oil slowly so everything emulsifies smoothly. You're creating a rich foundation that'll support the airy whites.
- Sift and fold the dry ingredients:
- Sift your flour mixture directly over the yolks and fold gently—overworking at this stage makes the cake tough. Use a spatula and move from the bottom up, turning the bowl as you go.
- Make your meringue:
- Beat the whites in a spotlessly clean bowl until foamy, then gradually add the remaining sugar while beating, watching until stiff glossy peaks form. This is what gives your cake its lift and tender crumb.
- Combine with care:
- Add the meringue in thirds, folding each addition gently so you keep as many air bubbles as possible. Rushing this step is where cakes get dense and heavy.
- Bake until springy:
- Pour into the tray, smooth it out, and tap once or twice on the counter to release trapped air. It should bake just until it springs back when you touch the center—about 13 to 15 minutes—no more or it dries out.
- Cool and release:
- While warm, flip the cake onto fresh parchment, peel away the baked paper carefully, and let it cool completely under a loose towel. This prevents it from drying while it cools at its own pace.
- Whip the hojicha cream:
- Whip your cold cream, powdered sugar, and hojicha powder together until you reach medium-stiff peaks—not over-whipped to butter-stage. The hojicha dissolves into the cream and tints it a pale beige-brown.
- Assemble and roll:
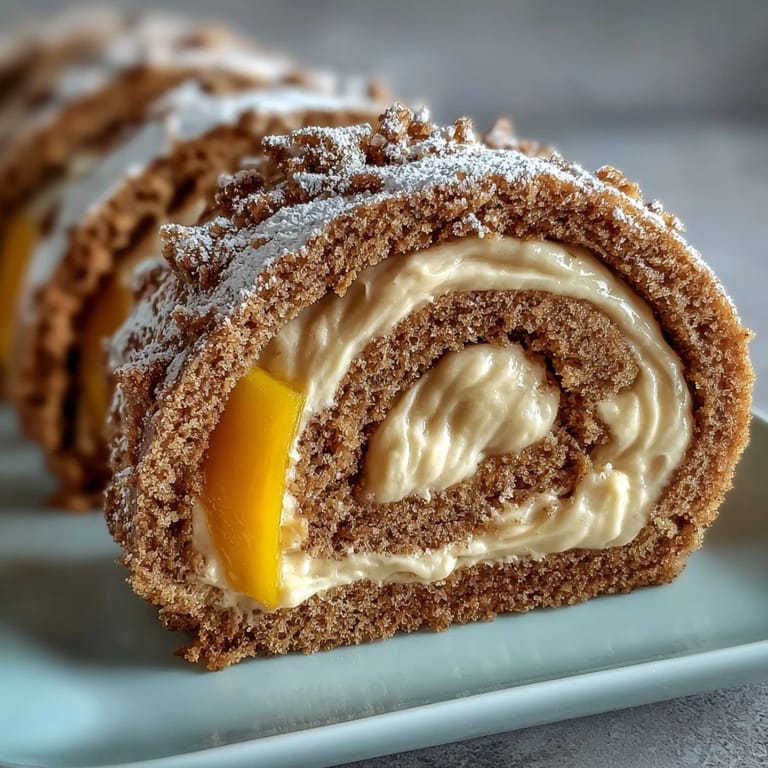
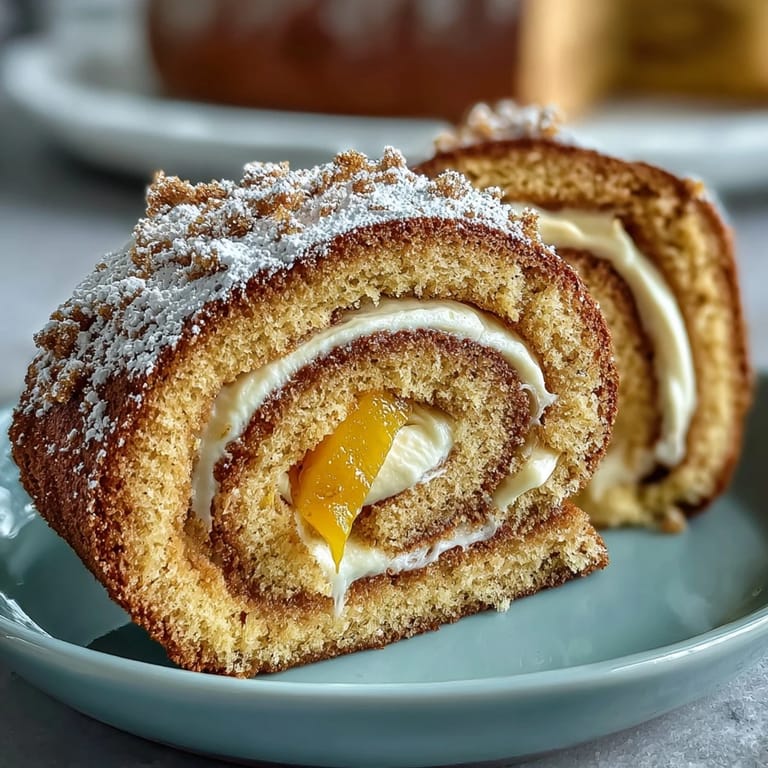
- Spread the cream evenly over the cooled cake, arrange mango strips along one short edge, then use the parchment underneath to help you roll tightly from that edge. The parchment is your friend here; let it do the work.
- Chill to set:
- Wrap the rolled cake in parchment and refrigerate for at least thirty minutes so the cream firms up and the roll holds its shape beautifully. This step feels like waiting but transforms the texture completely.
- Slice and serve:
- Use a warm, wet knife to cut neat slices, wiping between cuts. A sharp knife and gentle pressure keep the layers intact rather than compressing them.
 Save to Pinterest
 There's a moment when you unroll the parchment and see those spiral layers for the first time that feels almost ceremonial—like you've just created something beautiful that's also meant to be eaten and enjoyed right away. That's the magic of a roll cake; it's elegant but not precious.
Choosing Your Hojicha
Not all hojicha powder is created equal, and I learned this the hard way after buying a bargain tin that tasted faintly dusty and metallic. Seek out Japanese brands or specialty tea shops where you can ask about the roast level; a medium to dark roast gives you that warm, almost coffee-like depth without bitterness. If you can't find hojicha, strong brewed hojicha tea that's been cooled can replace the powder in the cream, though you'll need to whip it in more carefully to avoid adding too much liquid.
Mango or Beyond
The mango pairing works because its bright acidity cuts through the rich cream and the earthy hojicha, creating balance on your palate. But this cake is wonderfully adaptable—I've made versions with thin strawberry slices, peach slivers, even candied ginger when I wanted something spicier. The only rule is keeping whatever filling relatively thin and dry so it doesn't leak into the cream as the cake sits.
Storage and Make-Ahead Magic
This cake actually improves if you make it a day ahead; the flavors meld and the texture becomes even more tender as the sponge absorbs moisture from the cream. Keep it wrapped in parchment in the refrigerator, and it stays fresh for up to three days, though it's usually gone faster than that.
- Slice just before serving for the cleanest edges and to keep moisture from weeping into the cut surfaces.
- A dusting of hojicha powder or powdered sugar right before plating makes each slice look finished and intentional.
- If you're serving at room temperature, pull it from the fridge about fifteen minutes early so the hojicha cream softens slightly and tastes creamier on the tongue.
 Save to Pinterest
 Making a hojicha roll cake is less about following steps perfectly and more about treating the batter gently and trusting your instincts as you go. Once you've made it once, you'll understand why it's worth the care.
Recipe Questions & Answers
- → What makes hojicha different from regular green tea?
Hojicha is roasted green tea leaves, giving it a deep toasty flavor with lower caffeine content. The roasting process creates earthy, nutty notes that pair beautifully with creamy desserts unlike the grassy notes of unroasted green tea.
- → Can I make this roll cake ahead of time?
Yes, assemble and chill the roll up to 24 hours before serving. Wrap tightly in parchment and store in the refrigerator. The texture actually improves as the cream absorbs slightly into the sponge.
- → Why does my sponge crack when rolling?
Cracking usually happens when the cake cools completely before rolling. Roll while still warm to maintain flexibility. Overbaking also creates a dry sponge prone to cracking—check at 13 minutes.
- → What can I use instead of mango?
Thinly sliced strawberries, fresh peaches, or diced kiwi work wonderfully. You can also omit fruit entirely for pure hojicha flavor, or add roasted white chocolate chips for extra richness.
- → Is hojicha powder the same as matcha?
No, they're different. Hojicha powder is made from roasted green tea leaves, producing reddish-brown powder with nutty, toasty flavor. Matcha is ground unroasted leaves with vibrant green color and grassy taste.
- → Can I freeze this roll cake?
Yes, freeze the assembled roll wrapped in plastic then foil for up to 1 month. Thaw overnight in the refrigerator. Note that fresh mango texture may soften slightly after freezing—consider adding fruit after thawing.