 Save to Pinterest
 There's something about hojicha that stops you mid-morning—that toasted, almost nutty warmth that tastes like someone's been sitting with the tea leaves long enough to coax out all their hidden notes. I stumbled onto this cake during one of those rainy afternoons when nothing felt quite right until I smelled it baking, and suddenly the whole kitchen smelled like a Japanese teahouse mixed with coconut. It's not a cake you make to impress; it's one you make because you need to understand how something this elegant can also be so gentle.
I made this for my friend's book club night, and she kept the leftovers in her fridge for three days, eating small slices with her morning coffee like it was some kind of ritual. That's when I knew it had crossed from being just a nice recipe into something that actually fit into people's lives—not fancy enough to feel untouchable, but special enough to matter.
Ingredients
- Gluten-free all-purpose flour blend: The blend matters more than you'd think; make sure yours has xanthan gum or your crumb will feel sandy instead of tender.
- Almond flour: This adds moisture and a subtle richness that keeps the cake from tasting dry even though there's no eggs or butter.
- Hojicha powder: Hunt for good quality—the cheap stuff tastes flat and ashy, but the real thing has this roasted, almost coffee-like warmth.
- Baking powder and baking soda: Both matter here; the baking soda reacts with the vinegar to give you lift, while the powder keeps it steady.
- Almond milk with apple cider vinegar: This vegan buttermilk creates a slightly acidic environment that helps the cake rise and stay tender.
- Maple syrup: It's gentler than sugar and adds a subtle earthiness that plays beautifully with the hojicha.
- Coconut oil: Melted, not cold; this keeps everything binding together without that heavy butter feeling.
- Full-fat coconut milk: Must be refrigerated overnight—this is non-negotiable if you want frosting instead of a runny mess.
Tired of Takeout? 🥡
Get 10 meals you can make faster than delivery arrives. Seriously.
One email. No spam. Unsubscribe anytime.
Instructions
- Get your pan ready and preheat:
- Heat the oven to 350°F and grease your 8-inch pan generously, then line it with parchment so the cake slides out without sticking to the edges. This matters because a cake torn on removal tastes the same but feels like a small failure.
- Make your vegan buttermilk:
- Pour almond milk into a bowl, add the apple cider vinegar, and let it sit for 5 minutes while it curdles slightly—you'll see the milk thicken a bit and smell something slightly sharp and tangy. This is exactly what you want; it's doing the work eggs would normally do.
- Mix your dry ingredients:
- In a large bowl, whisk together the gluten-free flour, almond flour, hojicha powder, baking powder, baking soda, and salt until everything looks evenly speckled with the brown hojicha dust. Take your time here; breaking up any lumps in the hojicha powder matters.
- Combine the wet ingredients:
- In a separate bowl, pour in your curdled almond milk, maple syrup, melted coconut oil, and vanilla extract, and stir until they're fully combined and look glossy. Don't skip the vanilla—it rounds out the hojicha in a way that's hard to notice but impossible to miss.
- Bring it together gently:
- Pour the wet mixture into the dry ingredients and stir just until you don't see streaks of dry flour anymore—stop before your instinct tells you to keep stirring. Overmixing gluten-free cakes is how you get a dense, gummy interior, which defeats the whole purpose.
- Bake with patience:
- Transfer the batter to your prepared pan, smooth the top with the back of a spoon, and slide it into the oven for 30 to 35 minutes until a toothpick comes out clean with maybe one or two crumbs clinging to it. The kitchen will smell incredible around minute 25, but don't pull it out early; it needs those last few minutes to set properly.
- Cool strategically:
- Let the cake sit in the pan for 10 minutes—this is crucial because it's still setting, and moving it too soon breaks the structure. Then turn it out onto a wire rack and let it cool completely; rushing this step means warm frosting will slip right off.
- Prepare the frosting:
- Open your refrigerated coconut milk can carefully and scoop the thick, cream-colored solid part into a bowl, leaving the liquid behind for smoothies or another use. Beat this with maple syrup and vanilla using an electric mixer for 3 to 5 minutes until it's fluffy and holds soft peaks.
- Frost and finish:
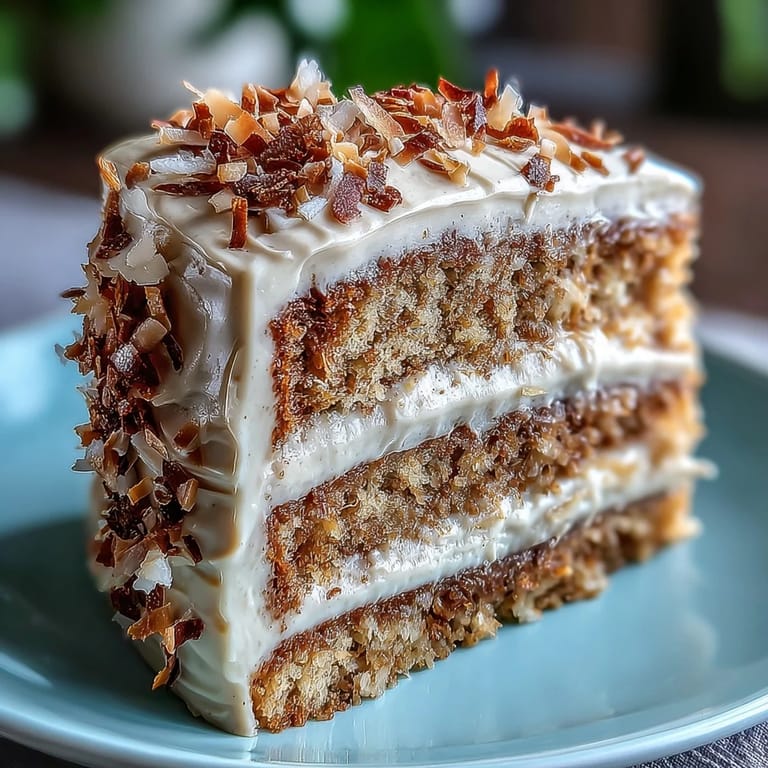
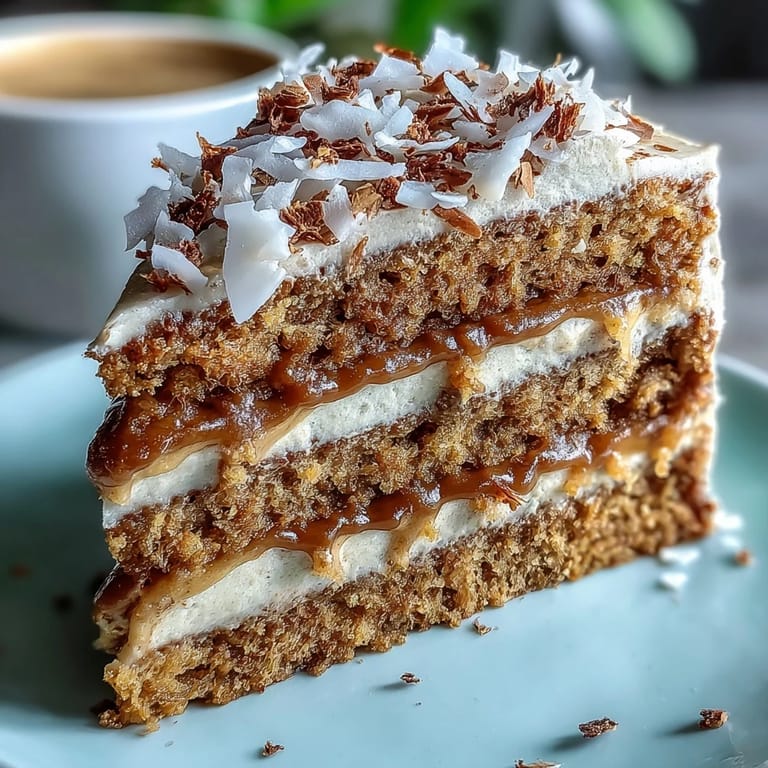
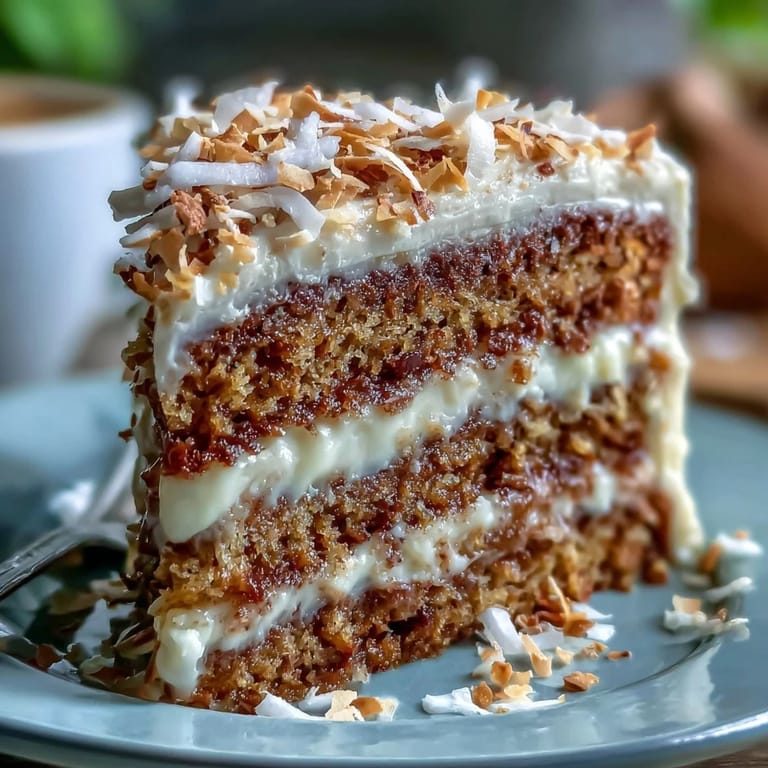
- Spread the frosting over the completely cool cake with an offset spatula or the back of a spoon, getting it as smooth or rustic as you prefer. Dust lightly with hojicha powder and scatter toasted coconut flakes on top if you want that extra textural moment.
 Save to Pinterest
 The moment someone bites into this cake and their eyes go quiet—that's when you know you've made something worth remembering. It's not about showing off; it's about that feeling when someone tastes hojicha for the first time and suddenly understands what all the fuss is about.
The Hojicha Advantage
Hojicha is roasted green tea, which means it's softer and less bitter than regular matcha, but with way more complexity than just plain tea would give you. When you bake with it, that roasted character deepens even more, becoming almost caramel-like without any actual caramel involved. It pairs with the coconut frosting in a way that feels unexpected until you taste it, then it feels inevitable—like they were always meant to meet.
Storing and Keeping
This cake actually gets better after a day because the hojicha flavor has time to settle and spread throughout the crumb. Keep it covered in the refrigerator and it'll last three days, though it rarely makes it that long once people know it's there. You can also freeze the unfrosted cake for up to a week, which means you can make the sponge ahead and frost it whenever you need something impressive on short notice.
Pairing and Serving
Serve this with hojicha tea, obviously, but also consider a light matcha latte if someone wants something creamier. The earthiness plays well with sake too—the kind that's delicate rather than heavy. A simple green tea or even hot water with a squeeze of lemon won't overshadow the cake, and that's the goal: letting the hojicha be the conversation piece.
- Slice with a warm, damp knife for cleaner cuts and less crumb breakage.
- Let leftover slices come to room temperature for 10 minutes before eating if they've been refrigerated.
- If the frosting cracks slightly when spreading, add a teaspoon of almond milk and beat again until it softens.
 Save to Pinterest
 This cake is proof that vegan baking isn't about substitution or compromise—it's about understanding how ingredients actually work together. Make it once and it becomes part of your regular rotation, the kind of thing you pull out when you want to feed people something that feels a little more thoughtful than ordinary.
Recipe Questions & Answers
- → What does hojicha taste like?
Hojicha offers a distinct earthy, roasted flavor with subtle caramel notes. Unlike matcha's grassy profile, hojicha is lower in caffeine and provides a warm, toasty taste that pairs beautifully with sweet desserts.
- → Can I substitute the almond flour?
You can replace almond flour with additional gluten-free flour blend, though the texture may be slightly denser. For nut-free options, try sunflower seed flour or oat flour, ensuring all ingredients remain certified gluten-free.
- → How do I store the finished cake?
Keep refrigerated in an airtight container for up to 3 days. The coconut frosting holds its best texture when chilled. Bring slices to room temperature 15 minutes before serving for optimal flavor and texture.
- → Why must the coconut milk be refrigerated overnight?
Chilling separates the solid cream from the liquid. Only the thick cream portion whips into fluffy frosting—the reserved liquid works wonderfully in smoothies or other baked goods.
- → Can I make this as a layer cake?
Absolutely—double the sponge batter and use two 8-inch pans. You'll need approximately 1.5 times the frosting quantity to fill and coat both layers properly. Adjust baking time as needed.